Pumpkin Ice Cream Cake
This recipe is the ultimate fall dessert 🍂
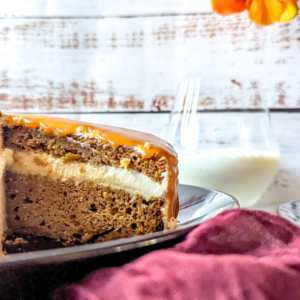
As the leaves begin to change in colour and the temperature begins to drop there is no better way to welcome fall than with a delicious slice of moist pumpkin ice cream cake.

Okay y’all, I’ve been taking a break from baking and working on my blog to catch up on life, literally!!!! With my son back in school, after school soccer, spending more one on one time with my daughter, and working a full-time job, finding time to bake and work on my blog has landed at the VERRYYY bottom of my list of things to do, and that’s okay!
Offline is the new luxury, am I right?
Anywhoo … Since we are heading into fall, I decided to bake an ice cream pumpkin cake, YUM!
I love fall! The color of the leaves, the colder weather, warmer clothing and most of all, comfort food!!! Who doesn’t love comfort food?
Let’s Talk About This Cake:
Pumpkin Cake:
I used two 9 × 1.5 in. for this pumpkin cake. I then sliced the cake in half for my the second layer.
The cake itself is not overpowering with pumpkin which I really enjoyed. A strong taste of pumpkin can sometimes ruin a dessert for me.
Ice Cream:
Second, I am using Breyers Vanilla ice cream. You want the ice cream to get a little soft before working with it.
Maple Frosting:
For the frosting, I used maple buttercream cream frosting and added maple syrup for some flavor. I only added one layer of frosting to the cake to avoid a melting disaster since the middle layer was ice cream.
Layering and Icing:
Okay, I hated this part! I love baking but when it comes to decorating, yuck! Definitely not my thang.
The icing I used for the cake was maple buttercream frosting, which I made a day in advance.
Caramel Topping:
Finally, I topped the cake with homemade caramel and added a beautiful drip.
Tip: Don’t do everything in one day. Make the cake one day, do the ice cream the following day and so on. You don’t want to get overwhelmed.
Why You Will Love This Recipe:
- This recipe is the epitome of fall flavors.
- The pumpkin cake recipe is moist and easy to bake.
- The addition of the vanilla ice cream makes this recipe the perfect contrast of cold and creamy with moist and warm.
- Perfect for any occasion, not just fall.
- Making the cake in advance makes this recipe easy to put together.
- This pumpkin ice cream cake is the perfect comfort food.

Recipe At A Glance:
Pumpkin Cake:
Can of pumpkin pie: I used one can of Ed.Smith pumpkin pie filling.
Flour: All purpose flour is needed. You will need two and a half cups.
Baking Soda: 2 tsp.
Baking Powder: 2 tsp.
Salt: 1 tsp for taste.
Canola Oil: One cup is needed.
Milk: I used half a cup of fairlife lactose free milk.
Brown Sugar: I used one and a half cups.
Eggs: I used four eggs.
Vanilla Extract: For taste. I used 2 tbsp.
Pumpkin Spice Extract: I used LorAnn Oils Pumpkin Spice Bakery Emulsion. AAAAMAAZING stuff! I purchased from Michael’s.
Maple Buttercream Frosting:
Butter: One stick of butter for the maple frosting.
Maple Syrup: I used two Tbsp. For the frosting.
Powdered Sugar: About five cups will be needed.
Salt: For taste.
Homemade Caramel:
Heavy Cream: Half a cup of lactose free heavy cream.
Sugar: I used one cup of granulated sugar.
Butter: six tbsp. of lactose free butter.
Ice Cream:
Breyers Vanilla Ice Cream: For the middle layer of my pumpkin cake. I used lactose free.
Equipment Needed:
Mixing Bowl: For your ingredients.
Hand Mixer: For mixing.
Measuring Spoons and Cup: For accurate measurements.
Can Opener: To open the can of pumpkin.
Spatula: For mixing
Cake Pans: For your cake and ice cream.
Tin Foil: For the ice cream.
Whisk: For mixing dry ingredients.
Parchment Paper: For the cake pans so the cake doesn’t stick to the pan.

Step By Step Instructions:
Step One:
Cake:
Preheat your oven to 350F.
Gather all of your ingredients and measure using a measuring spoon and cup.
Add a small amount of canola oil to both of the cake pans, then lay down some parchment paper into the cake pan and set aside.
Step Two:
In a mixing bowl, add oil, milk, eggs, vanilla extract and pumpkin spice extract. Mix everything together until fully incorporated.
Step Three:
Using a can opener, open the can of pumpkin pie filling and add it to the same bowl, then mix.
Step Four:
In a separate bowl, add your flour, baking soda, baking powder, sugar, and salt. Use a whisk and mix, getting rid of any lumps. Pour the dry ingredients into the wet mixture and give it a final mix before pouring the batter into two cake pans.
Step Five:
Place the cake into the oven and bake for about 40-45 minutes. Once the cake is baked, remove from the oven and allow the cake to fully cool before wrapping the cake in saran wrap and freezing.
Tip: Use the toothpick method to check the readiness of the cake. Poke the center of the cake with a toothpick. If the toothpick comes up clean, the cake is finished. IF the toothpick comes up dirty, the cake still needs to bake.
Ice Cream:
Take tin foil and add it to the bottom of a 9 × 1.5 in. cake pan. Add about half the tub of ice cream to the pan, smooth it out and freeze until ready to use.
Maple Frosting:
Step One:
Add two sticks of room temperature butter to a clean bowl and mix until creamed.
Step Two:
Add in powdered sugar a little at a time until you’ve reached the desired sweetness.
Tip: The more powder you add, the sweeter the frosting will be.
Step Three:
Add in vanilla extract, salt and about two to three tbsp. of milk then mix again. Set aside until ready to use.
Caramel Topping:
See my homemade caramel for the recipe.
Putting The Pumpkin Ice Cream Cake Together:
Step One:
Add a small layer of maple frosting to a cake board then take your already baked cake out from the freezer and add the first layer onto a cake board.
The frosting will act a sealing agent so your cake will not move.
Step Two:
Remove your ice cream from the freezer. Add some frosting onto the top of your cake then add the layer of ice cream over top then add the second layer of pumpkin cake on-top of the ice cream.
Step Three:
Cover the entire cake with maple frosting before adding the caramel sauce on-top of the cake.
Tip: I do recommend working fast when icing the cake as the ice cream will start to melt, making it much harder to work with.
Serve and enioy!
Pumpkin Ice Cream Cake with Lactose – Free Ingredients
Equipment
- 2 Mixing Bowl For your ingredients.
- 1 Hand Mixer For mixing.
- 1 Measuring spoons and cup For accurate measurements.
- 1 Can Opener For opening the can of pumpkin.
- 1 Spatula For mixing.
- 2 Cake Pans For cake batter and ice cream.
- Tin Foil For the ice cream.
- Whisk For mixing dry ingredients.
- Parchment Paper For the cake pans so your cake doesn't stick.
Ingredients
Pumpkin Cake
- 1 can Pumpkin pie filling
- 2 1/2 cups Flour
- 2 tsp Baking Soda
- 2 tsp Baking Powder
- 1 tsp Salt
- 1 cup Canola Oil
- 1/2 cup Milk lactose free
- 1 1/2 cups Brown Sugar
- 4 Eggs room temperature
- 2 tbsp. Vanilla Extract
- 3 tbsp. Pumpkin Spice Extract
Maple Buttercream
- 1 stick Butter lactose free
- 2 tbsp. Maple Syrup pure
- 5 cups Powdered Sugar
- 1 tsp Salt
Caramel
- 1/2 cup Heavy Cream lactose free
- 1 cup Sugar white sugar
- 6 tbsp. Butter
Ice Cream
- 1/2 tub Breyers Vanilla Ice Cream lactose free
Instructions
Cake
- Preheat your oven to 350F.
- Gather all of your ingredients and measure using a measuring spoon and cup.
- Add a small amount of canola oil to both of the cake pans, then lay down some parchment paper into the cake pan and set aside.
- In a mixing bowl, add oil, milk, eggs, vanilla extract and pumpkin spice extract. Mix everything together until fully incorporated
- Using a can opener, open the can of pumpkin pie filling and add it to the same bowl, then mix.
- In a separate bowl, add your flour, baking soda, baking powder, sugar, and salt. Use a whisk and mix, getting rid of any lumps.
- Pour the dry ingredients into the wet mixture and give it a final mix before pouring the batter into two cake pans
- Place the cake into the oven and bake for about 40-45 minutes. Once the cake is baked, remove from the oven and allow the cake to fully cool before wrapping the cake in saran wrap and freezing.
Ice Cream
- Take tin foil and add it to the bottom of a 9 × 1.5 in. cake pan. Add about half the tub of ice cream to the pan, smooth it out and freeze until ready to use.
Maple Frosting
- Add two sticks of room temperature butter to a clean bowl and mix until creamed.
- Add in powdered sugar a little at a time until you’ve reached the desired sweetness.
- Add in vanilla extract, salt and about two to three tbsp. of milk then mix again. Set aside until ready to use.
Homemade Caramel
- See homemade caramel for full recipe
Notes
How To Store This Pumpkin Cake Recipe:
Because the middle layer is ice cream, I highly recommend that the cake gets stored in the freezer to avoid a melting disaster!
Simply, slice the cake into individual slices, wrap with saran wrap and freeze.
Tips And Variations:
- Don’t over mix the batter.
- I used lactose free ingredients, however , feel free to use ingredients that are not lactose free.
- Feel free to add maple extract to the maple frosting for an intense flavor.
Recipe Facts:
Can I make this cake recipe in advance and refrigerate it?
Heck yeah! You can 100% make this cake in advance! Just wrap the cake in saran wrap and freeze and use when ready to put together.
How do I keep my cake moist?
The best way to keep your cake moist is by wrapping it in saran wrap and only use it when ready. That way the air does not dry your cake.
Thank You:
Thank you for reading my post today! If you enjoyed my post, show some love.
Comment below if you have any questions or if you’ve tried my Ice Cream Pumpkin Cake.
Hopefully baking brings you joy and happiness as it does for me and my family!
From my kitchen to yours,
Jas.